
Summary:
You’re looking at metal roofing because you’re tired of replacement cycles, worried about fire risk, or frustrated with energy bills that spike every summer. Smart move. But once you start researching, you realize “metal roof” covers a lot of ground. Corrugated panels, exposed fasteners, standing seam, raised seams—the options pile up fast.
Here’s what matters: standing seam systems sit at the top of the metal roofing hierarchy, and there are specific reasons why. This isn’t about upselling you on features you don’t need. It’s about understanding what you’re actually getting for the investment, how the system works, and whether it solves the problems you’re facing with your current roof. Let’s start with what defines a standing seam roof and why it performs differently than other metal options.
Standing Seam Roof: Complete System Overview
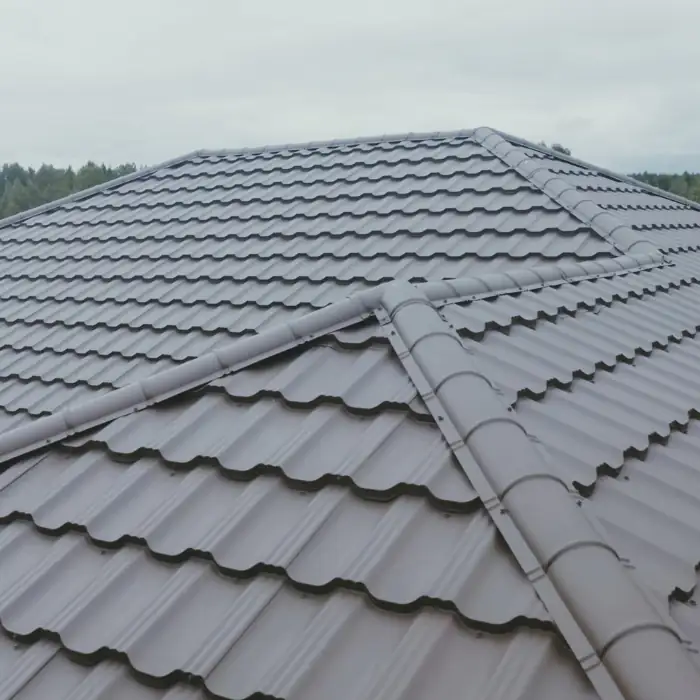
A standing seam roof consists of wide, flat metal panels with raised vertical seams that interlock along the edges. Those raised seams—typically 1 to 2 inches tall—run from your roof’s eave to the ridge, creating clean vertical lines across the entire surface.
The defining feature is the concealed fastener system. Unlike corrugated or exposed fastener panels where screws penetrate through the metal face, standing seam uses hidden clips or fasteners beneath the seams. This means zero fastener penetrations on your roof’s surface. No exposed screw heads. No rubber washers degrading in the sun. No thousands of potential leak points.
The panels themselves are precision-engineered to snap together or mechanically seam with specialized tools. They’re typically made from 24-gauge steel, aluminum, or premium metals like copper, with protective coatings that resist fading and corrosion for decades.
How Standing Seam Panels Actually Lock Together

There are three main types of standing seam systems, and understanding the difference helps you make sense of cost variations and performance claims.
Mechanically seamed panels require a hand-seaming tool that crimps the two panel edges together, creating an extremely weather-tight seal. This is the most weather-resistant option, ideal for low-slope roofs or areas with heavy rain. The tradeoff is installation takes longer and requires skilled labor, which drives up costs. But you’re getting the tightest possible seal—these systems can handle roof pitches as low as half an inch per foot.
Snap-lock systems feature pre-engineered male and female legs that literally snap together without special tools. The panels click into place, making installation faster and less labor-intensive. You’ll see lower installation costs with snap-lock, though the seam isn’t quite as tight as mechanically seamed. For most residential applications with standard roof pitches, snap-lock delivers excellent performance.
Nail flange systems fasten directly to the roof deck through slots in the male leg, then the female leg snaps over to conceal the fasteners. This is typically the most affordable standing seam option, but you sacrifice some performance by relying solely on fastener heads rather than clips that allow thermal movement.
The clip system in quality standing seam installations does something critical: it lets your roof breathe. Metal expands when it heats up and contracts when it cools down. Los Angeles sees significant temperature swings between day and night, especially in inland areas. Clips allow panels to move slightly without warping, buckling, or working fasteners loose. That’s why properly installed standing seam roofs can last 40 to 70 years while maintaining their appearance and weather resistance.
Panel width typically runs 12 to 18 inches, with 16 inches being most common. Wider panels mean fewer seams, which can reduce installation time. But wider flat areas also show more oil canning—that slight waviness you sometimes see in metal panels. Many manufacturers add striations or stiffening ribs to the flat area between seams to minimize this visual effect.
Best Metal Roof Materials for Los Angeles County Climate
Southern California’s climate puts specific demands on roofing materials. You’re dealing with intense UV exposure, high heat, occasional heavy rains, and wildfire risk. Not every metal performs equally under these conditions.
Steel with PVDF coating is what most Los Angeles County homeowners choose, and for good reason. A 24-gauge steel panel with Kynar 500 or similar PVDF finish gives you decades of color retention at a fraction of what premium metals cost. The PVDF coating resists fading, chalking, and corrosion far better than standard painted finishes. Expect this to run $10 to $16 per square foot installed.
The coating matters more than most people realize. Standard SMP (silicone modified polyester) paint is cheaper but fades noticeably in Southern California’s relentless sun. PVDF coatings use fluoropolymer technology—the same stuff used on commercial buildings that need to look good for 30-plus years. The difference in appearance after 15 years is dramatic.
Aluminum makes sense if you’re within 10 to 15 miles of the coast. Salt air corrodes steel faster than aluminum, even with protective coatings. Aluminum costs slightly more—$11 to $17 per square foot installed—but it won’t rust. The tradeoff is aluminum dents more easily than steel if you’re in an area that sees hail or has large trees overhead.
Copper and zinc represent the luxury tier at $20 to $35 per square foot installed. These metals develop a natural patina over time, shifting from their original color to distinctive weathered tones. They’re self-healing—minor scratches seal themselves through oxidation. The lifespan can exceed 100 years. But you’re paying three to four times what steel costs, which only makes sense for specific architectural styles or historic restorations.
For fire resistance, all of these metals provide Class A fire ratings when properly installed. That’s critical in Los Angeles County, where wildfire risk is a constant concern. Metal roofing won’t ignite from flying embers, and it won’t contribute fuel if fire reaches your property. This is one area where metal dramatically outperforms asphalt shingles or wood shakes.
The reflective properties of metal roofing deliver real energy savings in Southern California’s climate. Light-colored metal roofs reflect up to 70% of solar energy, keeping your attic and living spaces cooler. That translates to 10 to 25% reduction in cooling costs during summer months. When you’re running AC from May through October, those savings add up. Metal roofs often qualify for cool roof rebates under California energy codes, which can offset some of the upfront cost.
Standing Seam Metal Roof Installation Process
Installation quality determines whether your standing seam roof performs as designed or becomes a source of problems. The concealed fastener advantage disappears if your installer creates gaps in the seams or doesn’t account for thermal movement correctly. This is specialized work that requires specific skills and equipment.
The process starts with roof deck preparation. We inspect the existing decking for damage, replacing any compromised sections. The deck needs to be solid and level—standing seam systems require continuous solid substrate, not open framing. Any unevenness beyond a quarter inch in 20 feet can cause installation problems.
High-temperature synthetic underlayment goes down next. This isn’t standard felt paper. Metal roofs get hot—surface temperatures can hit 180 degrees or higher in direct sun. Regular asphalt-based underlayment can melt and ooze out from the eaves. Synthetic underlayment is engineered to handle these temperatures while providing a slip sheet that allows panels to expand and contract smoothly.
Critical Steps That Separate Quality Installation from Problems
Eave and rake trim installation comes before panels. These edge pieces provide a clean finished appearance and create the attachment point for the first and last panels. The eave trim typically includes a drip edge that directs water into gutters rather than behind the fascia. Proper flashing at these transitions prevents water infiltration at roof edges.
Panel layout gets planned before the first panel goes up. You want the first and last panels to be similar widths for visual balance. If pipe penetrations or vents are present, panel layout needs to position them in the center of panels rather than at seams. This requires measuring the roof and calculating panel placement before installation begins.
The first panel sets the tone for the entire roof. It needs to be perfectly square to the roof edge, or every subsequent panel will drift off at an angle. Experienced installers use the 3-4-5 triangle method to establish a square reference line. If the first panel is even slightly off, you’ll end up with tapered panels or sawtoothing at the eaves where square-cut panel ends meet neighboring panels at an angle.
Clips get installed along the male leg of each panel, typically spaced 16 to 24 inches apart. In high-wind areas of Los Angeles County—coastal zones or properties on ridgelines—spacing reduces to 12 inches for better wind uplift resistance. The clips fasten to the roof deck with screws that penetrate the substrate by at least a quarter inch. But here’s the critical part: the screws don’t get overtightened. The clip needs to allow slight movement as the metal expands and contracts.
Each successive panel interlocks with the previous one. For snap-lock systems, the female leg snaps over the male leg and clips. You hear and feel it click into place. For mechanically seamed systems, the installer uses a hand seamer to crimp the two legs together, working from bottom to top. The seaming process requires consistent pressure along the full length to ensure there aren’t gaps where water could penetrate.
Z-bar or closure strips get installed at the ridge before the ridge cap goes on. The raised seams create a gap between the panel surface and the ridge. Z-bar fills this gap, preventing water from getting through at the top of your roof. The ridge cap then covers the Z-bar and creates the finished appearance at the peak.
Flashing around penetrations—vents, chimneys, skylights—requires custom fabrication. Each piece needs to integrate with the panel system while directing water away from the penetration. This is where installation quality shows. Sloppy flashing creates leak points that undermine the entire system’s weather resistance.

Why Professional Installation Matters More Than DIY Savings
Standing seam installation isn’t a weekend DIY project, even if you’re handy. The specialized tools, precision required, and consequences of mistakes make this one area where professional installation pays for itself.
The seaming equipment alone represents a significant investment. Mechanical seaming requires hand seamers or powered seaming machines that most homeowners won’t use again after one project. Snap-lock systems seem simpler, but proper clip placement and panel alignment still require experience to get right.
The margin for error is razor-thin. The difference between overtightening and undertightening a fastener might be a quarter turn on the drill. Overtighten and you crush the clip, preventing thermal movement and creating stress points where panels can buckle. Undertighten and the fastener works loose over time, allowing panels to shift or lift in high winds.
Thermal movement calculations matter. In Los Angeles County, roof surface temperatures can swing 100 degrees or more between a cool winter night and a hot summer afternoon. Metal expands roughly 0.0065 inches per foot for every 100-degree temperature change. On a 30-foot panel, that’s nearly two inches of movement. If the installation doesn’t accommodate this, you’ll see warping, buckling, or fasteners pulling loose.
Warranty protection depends on proper installation. Most metal roofing manufacturers offer material warranties of 30 to 50 years, but these warranties become void if installation doesn’t meet their specifications. You need documentation that installation followed manufacturer guidelines. Professional installers provide this documentation. DIY installations don’t.
The cost difference between DIY and professional installation might seem significant upfront. But a $3,000 savings on labor becomes an $8,000 repair problem when improper installation causes leaks or panel failure. And if you’re financing the project, many lenders require professional installation to approve the loan.
For a 2,000 square foot roof, expect installation to take 2 to 5 days depending on complexity. Simple gable roofs with no valleys or dormers go faster. Complex roofs with multiple roof planes, skylights, chimneys, and steep pitches take longer. The installer’s experience level also affects timeline—a crew that specializes in standing seam works more efficiently than general roofers who occasionally install metal.
Is a Standing Seam Metal Roof Worth the Investment?
Standing seam roofs cost more upfront than asphalt shingles or exposed fastener metal panels. That’s not debatable. What is debatable is whether the higher initial cost delivers enough value to justify the investment. The answer depends on your timeline, priorities, and what you value in a roofing system.
If you’re planning to stay in your home for 20-plus years, the math favors standing seam. You’ll replace asphalt shingles two or three times over 50 years, paying for tear-off, disposal, and installation each time. Standing seam gets installed once. The long-term cost often ends up lower, even with the higher starting price. Add in energy savings from reduced cooling costs, minimal maintenance requirements, and increased home value, and the financial case strengthens.
The concealed fastener system eliminates the ongoing maintenance that exposed fastener roofs require. No checking thousands of screws every few years. No replacing degraded washers. No leak anxiety every time it rains. For homeowners who value peace of mind and low-maintenance solutions, this alone justifies the premium.
If you’re in a fire-prone area of Los Angeles County—and much of the county qualifies—the fire resistance provides security that’s hard to price. Standing seam won’t eliminate wildfire risk, but it removes your roof as a vulnerability point. That matters when embers are flying and you’re wondering whether your home will survive.
At Royal Roofing Company, we bring 40-plus years of experience to standing seam installations across Los Angeles County. Our factory-certified crews, photo-documented workmanship, and hands-on educational approach help homeowners make informed decisions about roofing systems that will protect their properties for decades.